How to Download Your Videos

How to Download Your Videos

In this video, I’m going to share a quick trick to get your videos from youtube and onto your computer.


One of the great features of hosting sites and specifically YouTube is that they allow you to download your videos once you’ve uploaded them. Now why would you want to do this?


1. You’ve lost the original video that you had saved on your computer and you need to edit

it again or upload it onto another hosting site

2. You had a google hangout and you want to edit it down or save it

3. You want to delete a video from youtube but you want to save it on your computer first


There are many more reasons that you might want to download your video from your hosting site.


So let me show you how to do it. It’s super easy. All you have to do is go into your video manager, find the video you want to download, click the little arrow next to edit and choose download mp4.


It’s that simple. Oh and another quick tip, use a computer plugged in via ethernet for a faster download.


You can also do this on Vimeo and Wistia. On Vimeo just click on the video you want to download and go to the download button right under the video.

On Wistia choose your video, then go to video actions and choose download.

I wanted to make sure you knew about this simple but awesome feature so you don’t freak out if you lose a file or just can’t figure out where to go to download your video.


Now, I’d like to hear from you, what’s your biggest video question? Let me know in the comments below.


If you liked this video, don’t forget to subscribe and share it with your friends. If you want more, come on over and the Storyteller Circle, my private facebook group filled with wonderful entrepreneurs like you that are looking for more support in crafting their video stories and an inspirational community. I adore the people in this group so I post some of my best stuff there. When you join you’ll instantly get a bonus gift “How to Reach, Grow & Teach Your Online Community With Video”. Just click the button below. And remember Tell Your Story. Inspire Action. Make a Change. Thanks for watching and I’ll see you next time! 


If you liked this post please comment and share. I’d love to hear from you.

Want to use video to grow your biz AND be of service like crazy?

Get your guide to pick and choose the types of video you’d love to create, get your tools, and start creating!

3 Tips to Make Your Footage Look Better

3 Tips to Make Your Footage Look Better

Today, I’m going to share 3 things you can do today to make your footage look better.


In the film industry there is this running joke where everyone who isn’t an editor will say “Don’t worry we’ll fix it in post” meaning don’t worry the editors will fix it. But news flash not everything can be fixed in post. So I’m going to share with you two things to do while you are filming and one thing to do in editing that will make your footage look even better.


1. Add more, even, light to your subject.

Most of the time your issue is going to be that you don’t have enough light on the subject of your shot, whether that’s your face, or an object. If this is happening either switch up where you are filming so you’re subject is facing a window or buy a set of cheap softbox lights that comes with these white sheets that you put in front of the light to diffuse it so it isn’t so harsh and causing shadows.

I have a recommendation for you in my Top 5 VIdeo tools pdf that you can download by clicking the link that just popped up.


2. Blur out your background.

This is known as shallow depth of field, so what you are doing is making your background interesting by having some stuff behind you but then blurring it out so that it is soft and not distracting.

The easiest way to do it is with a DSLR and a telephoto or fast prime lens whose aperture opens up to a 1.5. What you would do is place your subject a good distance from your background. Then back up your camera and zoom in while also opening your aperture as wide as it can go.

Now most of you, I’m sure are using iphones, so to do that you can get an app like FilmicPro to have more control over your camera’s settings and then just do the same thing as with a DSLR.

If you are using a webcam you can film via google hangouts on air and they have this nifty feature in the effects panel that’ll blur out your background.


3. Color Correct.

If your footage is too dark, bright, yellow, blue or green you can sometimes fix this in editing if it’s not too far gone.

Camtasia has a color adjustment effect and so does Imovie, so you can go in and adjust your settings. In another video I’ll show you exactly how to do that.


If you want more tips to creating online video, download your guide to the Top 5 Video Tools that will help you make beautiful online videos for your business Or if you really ready to dive in join my free course to Amp Up You Online Video Presence. By signing up you’ll also get exclusive Tips, Tricks, How-to’s and my personal insights about editing and using Online Videomaking in your business that I only share with my VIP storytellers.


If you liked this post please comment and share. I’d love to hear from you.

Download the "How to Reach, Grow, & Teach Your Online Community" guide AND be of service like crazy!

Pick and choose the types of video you'd love to create, get your tools, and start creating!

You got it! Check your inbox!

Why You Should Write Your Scripts and Then Throw Them Away

Today, I am going to reveal to you why you should write your scripts and then get them out of your way.


Since I started creating my own video blogs I started thinking about how long I was taking to write my scripts and then read them word for word to the camera. I watched my videos and I looked so stiff and not connected to my message and all of you. So I decided to actually take my own advice and I changed my process to this:
First, I still write out my script, that way I could have a pseudo transcript and text for my blog post. I can also organize my thoughts. I also mark where I could insert some B-Roll imagery. This lets me know what ideas I should get through completely without stopping and where I can pause.

Second, I pull out the important bullet points and make them bold and big. That includes my intro and call to action at the end.

Third, I put my script away!

When I film now, I have my bullet points on my handy ipad, next to me, just so I can refer to it. But I try my best to just get my thoughts out there and later in editing I can make sure I’m getting to the point and add all my graphics and B-roll.

This way I can get out of my head and into the moment of when I’m speaking with you.


BUT I still believe in writing scripts and planning so please keep doing this. Just put the script away when it’s time to film. With some practice this will make all the difference, in you coming across as genuine, caring and trustworthy. 

 
If you want more tips to creating online video, download your guide to the Top 5 Video Tools that will help you make beautiful online videos for your business Or if you really ready to dive in join my free course to Amp Up You Online Video Presence. By signing up you’ll also get exclusive Tips, Tricks, How-to’s and my personal insights about editing and using Online Videomaking in your business that I only share with my VIP storytellers.


If you liked this post please comment and share. I’d love to hear from you.

Download the "How to Reach, Grow, & Teach Your Online Community" guide AND be of service like crazy!

Pick and choose the types of video you'd love to create, get your tools, and start creating!

You got it! Check your inbox!

Storyboarding for Your Business Videos

Storyboarding for Your Business Videos

I know you are probably super overwhelmed with working with your clients, creating your next course, and writing email newsletters and blog posts. You’re super busy and sometimes planning your videos just falls to the wayside. You want a super simple, easy, and fast process. And you can get that, but I’m telling you fast and easy doesn’t always mean great high quality video.


So if you are ready to take the time to bring your videos up a notch and are sick of writing, there is this awesome tool filmmakers use called storyboarding. It’s super fun and you’ll get to draw and get those ideas you just can’t get clear when you try to write them out.


Storyboarding does three things for you:

  1. relieves the stress of having to memorize or do everything in one take.
  2. gives you ideas for other imagery that you can show besides you talking
  3. it’s a visual document you can share with your team


Download your storyboard template.  Ok so open up the template and let’s get started. First you’ll see your header where you can put a title for the project, title of the video, the date and page number. This is really just for your organization. So let’s say we are creating a 3 part video series about creating awesome branding for an online business. So our project title is “Branding your online business 3 part training”, we are starting with “video 1 – your target market” , todays date and this is page 1.   Each of these boxes has space for three things: the shot number, an empty box for you to add your drawing or picture, and lines to add some description or text.   Let’s say shot 1 is you introducing the course and explaining what they are going to learn. We are just putting bullet points not the word for word script here. Then shot 2 can be a quick intro.  Shot 3 is you again explaining what a target market is. Now let’s say shot 4 you want to start talking about how to research your target market. Here you can show your methods. So let’s say you are explaining that they should send out surveys to past clients and in FB groups. So we can draw here an image of a sample survey or typing a question in a FB group. For every shot I want you to think, “What can I show here that would really drive the point home?” because just showing you talking for 5 minutes can really drive people away pretty quickly, just because they want to engage with other images. One word of warning: Dont get carried away trying to draw something perfect. The point is to get your ideas out visually not create an artistic masterpiece. You can even insert images digitally if you’d rather not draw. Just open up the template in photoshop or import it into word.   Those are the basics of storyboarding!   I’d recommend storyboarding before you write your script since it’ll give you an outline and you might even add or take out some language because you thought of a different way to approach a segment during storyboarding.     Don’t forget to download your storyboard template.
If you want more tips to creating online video, download your guide to the Top 5 Video Tools that will help you make beautiful online videos for your business Or if you really ready to dive in join my free course to Amp Up You Online Video Presence. By signing up you’ll also get exclusive Tips, Tricks, How-to’s and my personal insights about editing and using Online Videomaking in your business that I only share with my VIP storytellers.


If you liked this post please comment and share. I’d love to hear from you.

Download the "How to Reach, Grow, & Teach Your Online Community" guide AND be of service like crazy!

Pick and choose the types of video you'd love to create, get your tools, and start creating!

You got it! Check your inbox!

The Best Piece of Editing Advice I’ve Ever Received

The Best Piece of Editing Advice I’ve Ever Received

Today, we are going to get a little conceptual here. You know when you think back to that moment when it all just clicked. When something someone said just made you completely understand what you’ve been trying to learn or even master. Yeah, that’s what we are talking about today. I’m super lucky that this happened to me early on when I was learning how to edit video. I was creating my first documentary which you’ve heard me talk about before and my professor said one sentence to me, “Cut for your action, don’t anticipate it.”


I know you’re thinking, what does that even mean? And how does it apply to my business videos. Let’s break it down.

It’s well known in the industry that good editing is invisible to the audience. Good editing compliments and shapes your story but doesn’t overpower it.


So what my professor was trying to tell me was don’t make a cut that helps the audience anticipate what will happen next, instead react to what’s happening and cut on the action instead of after or before it happens.


So let’s watch this clip. Did you notice the cut? Probably. and that’s because she finished her thought so you anticipated that something would happen and that was the cut and zoom.

Now watch this clip. Did you notice it there? Probably not, and that’s because we cut to the second angle during the action.


Now how does this help you? Editing your videos like this will create an association in your viewers head with high quality video content. It’s what I call the HBO effect.

HBO is a television network. Period. But you know how everyone reacts to it. Everyone wants it, is willing to pay extra for it and praises their shows to no end. Why? because their shows are filmed like movies. They treat each show like an hour long film. You can see it in the writing, filming and especially the editing. They use editing techniques like what I just showed you to create mini films not TV shows. And other networks like AMC and FX quickly followed suit.


So how can you do this?

First, think about your scripts; when are the natural pauses that give your audience space to digest, when do you need to keep moving? This might sound like the opposite of what you would expect, but cut more when you need to keep moving and slow down the cuts for the natural pauses.


If you’re ready, introduce a second camera to your setup. This will allow you to cut between 2 different angles and create that flow of action that you saw in that clip. So that instead of cutting after a sentence or thought you can cut during that thought and it’ll appear seamless.


If you want more tips to creating online video, download your guide to the Top 5 Video Tools that will help you make beautiful online videos for your business Or if you really ready to dive in join my free course to Amp Up You Online Video Presence. By signing up you’ll also get exclusive Tips, Tricks, How-to’s and my personal insights about editing and using Online Videomaking in your business that I only share with my VIP storytellers.


If you liked this post please comment and share. I’d love to hear from you.

Download the "How to Reach, Grow, & Teach Your Online Community" guide AND be of service like crazy!

Pick and choose the types of video you'd love to create, get your tools, and start creating!

You got it! Check your inbox!

3 Things to Add to Your Videos to Hook Your Clients

3 Things to Add to Your Videos to Hook Your Clients

I was a freshman in college when YouTube’s popularity exploded. I remember being so nervous trying to meet new people and make new friends. We had all just gotten our very own laptops and my roommate and I were sitting on our beds trying to get ready for the first day of classes. That’s when someone burst through our door: “You’ve got to see this video!”

3 hours later and we were still watching videos. Why? Because of that addictive “watch this next” feature. We just couldn’t resist.

You need to do this for your business. You need to have your customers still watching your videos 3 hours later. And then when they run out of videos (and even before), you need to lead them through your sales funnel or to wherever you need them to be.

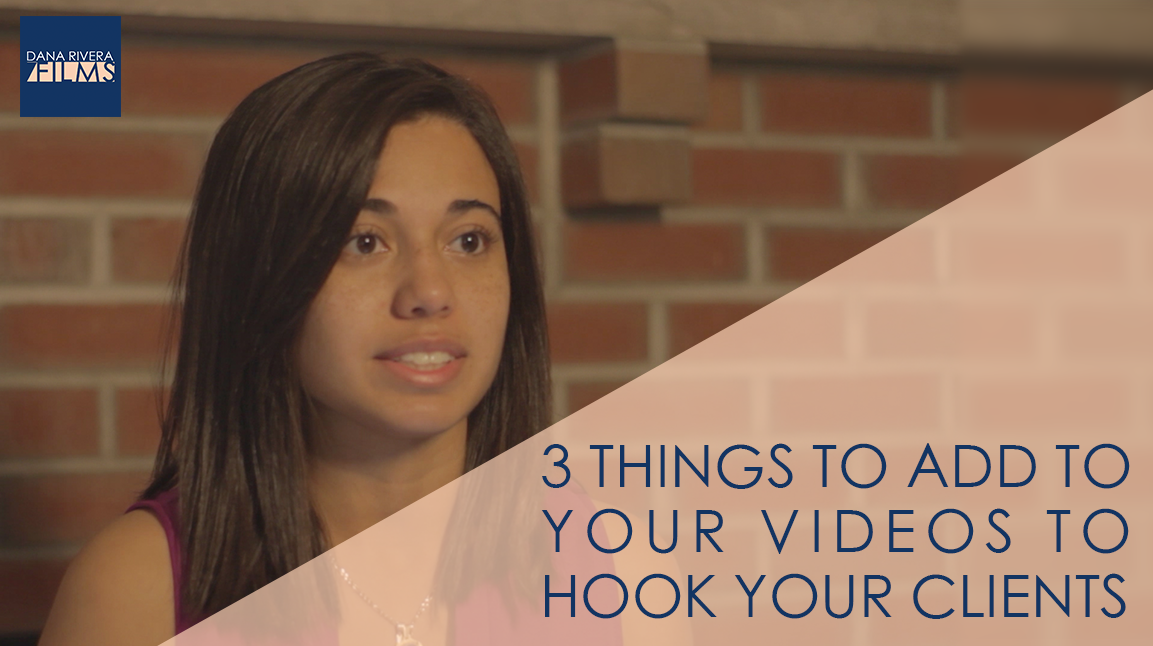
With these 3 simple additions to your videos you’ll hook your viewers and lead them:


1. Add a graphic banner with links to your website and social media.

No matter how many times you say your banner or social media handles during your video if your audience is anything like me they just won’t remember. It gets back to the point of multimedia: everyone learns differently. I respond better to visuals and you might respond better to audio and someone else may need both to really understand. Your audience will appreciate your effort to teach them in ways that are not just convenient to you but extremely beneficial to them.

It also squashes any chance that the viewer gets the spelling of your links wrong. Not to mention that branded graphics add to the quality of your videos and work to connect your videos with the rest of your marketing materials.

Tools:

  • Adobe Photoshop
  • Pic Monkey

Tip: make those links clickable! I’ll explain more in #3 below.


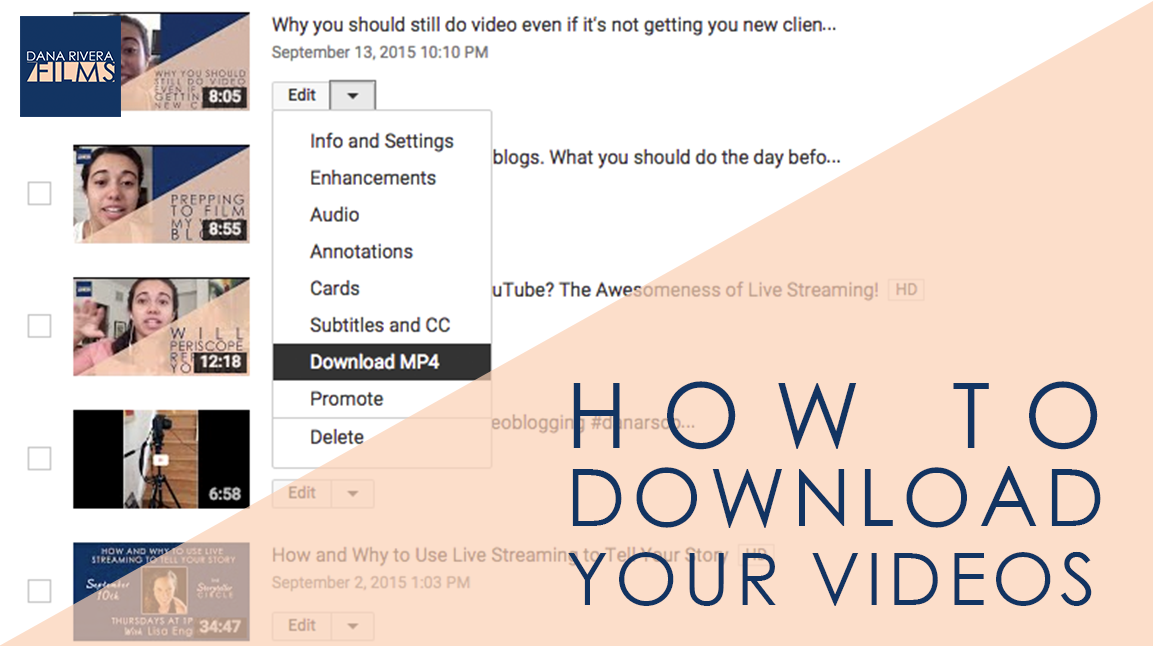
2. Look at the analytics for all of your videos. Find the most popular ones and add your banners and links in your descriptions to your site and social media.

Since you’ve already created videos and have some that have done pretty well (if you do say so yourself) you need to not neglect them. Even if that awful haircut makes you wince every time you see it. People love that content and you have to embrace it.

It’s probably safe to say that you are using YouTube or wistia to post your videos and both have analytics. Look at your views AND viewer duration. This is really important. Think of it this way. Views means you got somebody to click on your video. Viewer duration means you got them to stick around. And who is more likely to learn more about you and become your client? thats right! The ones that stuck around and found value in what you had to say.

You can do this two ways:

  • Add the banners you created
  • Add your links in the description and with annotations or mid roll links

The biggest difference between these two options is that with the first one you have to re edit the video file. This might be worth it you if you like editing, but it may seem too overwhelming. My suggestion is to add a banner to the 2 or 3 most popular and use the second option for the rest.

You don’t want to lose the momentum that the videos have gained so don’t delete the old video. On YouTube, redirect the old video to the new video using annotations. On Wistia, there is a Replace Video feature so you can maintain the seo and analytics.

You can eventually add your links to all of your videos but pick the top 2 or three to get you started. As entrepreneurs we are SO busy so don’t overwhelm yourself with updating 20 videos.


3. Add a call to action button

As important as a website banner is the one other graphic that may be an even bigger game changer is your call to action button. You’ve probably heard this a million times but your videos need a call to action, whether you are creating weekly episodes or a story based promotional video. You need to inspire your viewer to take action. And making it super simple for them to carry out your action gets you even closer to convincing that doubter to act. Putting a clickable button on screen that says “donate” “sign up” or “watch this video next” not only tells them what to do but with a click takes them where they need to go. All you have to do is design a button and edit it into your video. You can use the same tools from #1 above.

Tip: making clickable links is really easy. You can use YouTube or Wistia. On YouTube they are called annotations and on Wistia they are called mid roll links. With annotations you can draw the outline of a square or rectangle around your button image, put the link you want it to direct to in the link field, set how long it should stay on screen and voila! With mid-roll links you can type in the text of your button and the link and you don’t even have to design your own button.

I want you to get started on making these changes today so I created a free template for a call to action button that you can download by entering your email below. You’ll get a link straight to your inbox. By signing up you’ll also get exclusive Tips, Tricks, How-to’s and my personal insights about Online Videomaking that I only share in email.


If you liked this post please comment and share. I’d love to hear from you.


Download the "How to Reach, Grow, & Teach Your Online Community" guide AND be of service like crazy!

Pick and choose the types of video you'd love to create, get your tools, and start creating!

You got it! Check your inbox!

Page 2 of 3123