Dreams, Stories, & An Art Truck

Dreams, Stories, & An Art Truck

Sitting at the flea market with my family, I realized that walking down the entrepreneurial path is not something that I discovered on my own. It never occurred to me that the days spent helping Dad pack electronics into postal service boxes or setting up the tables filled with car speakers, phone cases, and headphones was part of being an entrepreneur. My Dad has had his own electronics wholesale business for as long as I can remember, but I had never thought of him as an entrepreneur. I dont know if it’s because he still has a full time job or because I just never thought about the word.

I guess I never tell people that its always been in my blood, like some who have had family members that are business owners, because this hasn’t always been my dream. It started as a necessity.


I graduated from college with $50,000 in debt and the excitement of getting my first job wore off pretty quickly.  I became so obsessed with checking my loan balances that I felt the walls building up around me and before I knew it I was looking up from the bottom of the pit not able to see the way out. I spent hours googling “how to pay off loans fast”, doing online surveys, and searching through my closet for things I could sell on ebay. I looked and sounded like a crazy person.


Then I came across blogs about personal finance, freelancing, and Odesk. The thought of freelance video production always seemed so intimidating to me, but this didn’t seem so bad: I could apply for a job online, Odesk takes care of the contract, I can do the work it quickly in my spare time and get some extra money for my monthly payment.


So I dove in and when I finally remembered to look at my loans again 1 year later I had brought down the total to less than $30,000 and built up my savings. I was ecstatic!


Not just because I had paid off so much, but because I was having so much fun. It was so exciting that it made my full time job seem like a trap. I had read so much about the freedom of online businesses and listened to podcasts on my hour and a half commute each way. At that point there was no turning back.


But I was conflicted. I work full time as a Video Production Manager at a nonprofit that provides legal aid to people in poverty. I always knew my purpose and there is nothing like working with people that care so much. In school, I always dreamt of using video to help others and how lucky am I to have found a job where I was doing that right off the bat. But I also want to travel, and live in a city, and take time off at the spur of the moment. I spent so long feeling guilty and not sure how to build my own business while helping those that are marginalized.

I sort of fell into the answer: Video editing and consulting for entrepreneurs and small business owners that were driven by a cause or a mission centered around helping others.


I’ve been on the path towards my own full time business ever since and i’ve never been happier. I started blogging, being active in online communities filled with such supportive and talented people, and putting myself out there more than I ever had before.


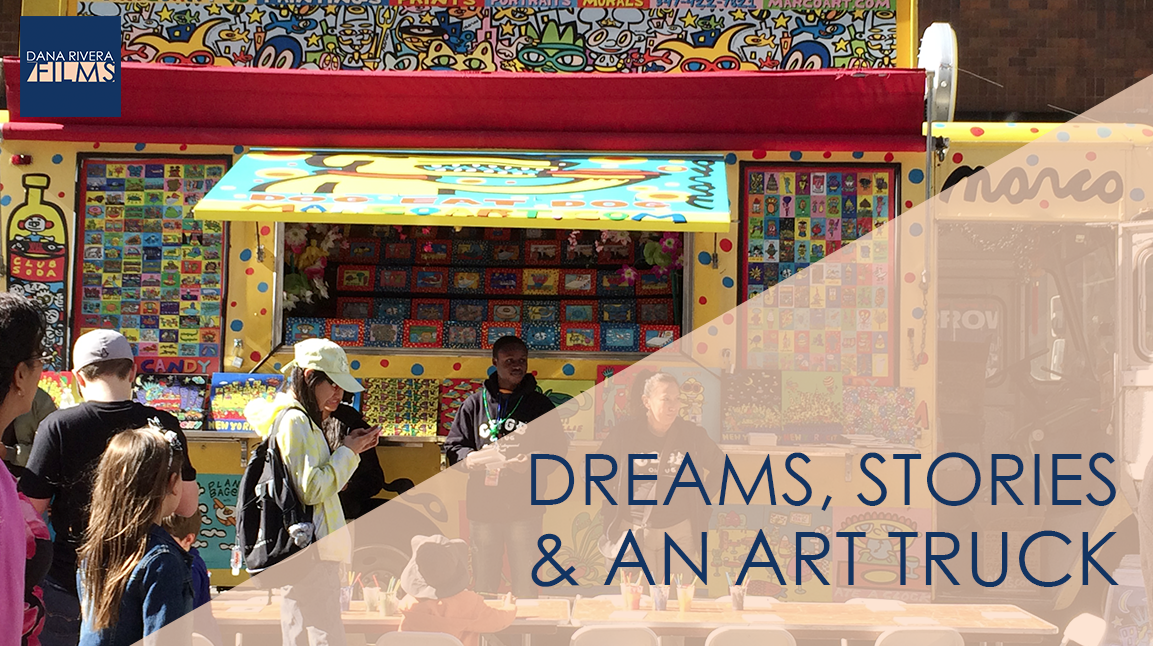
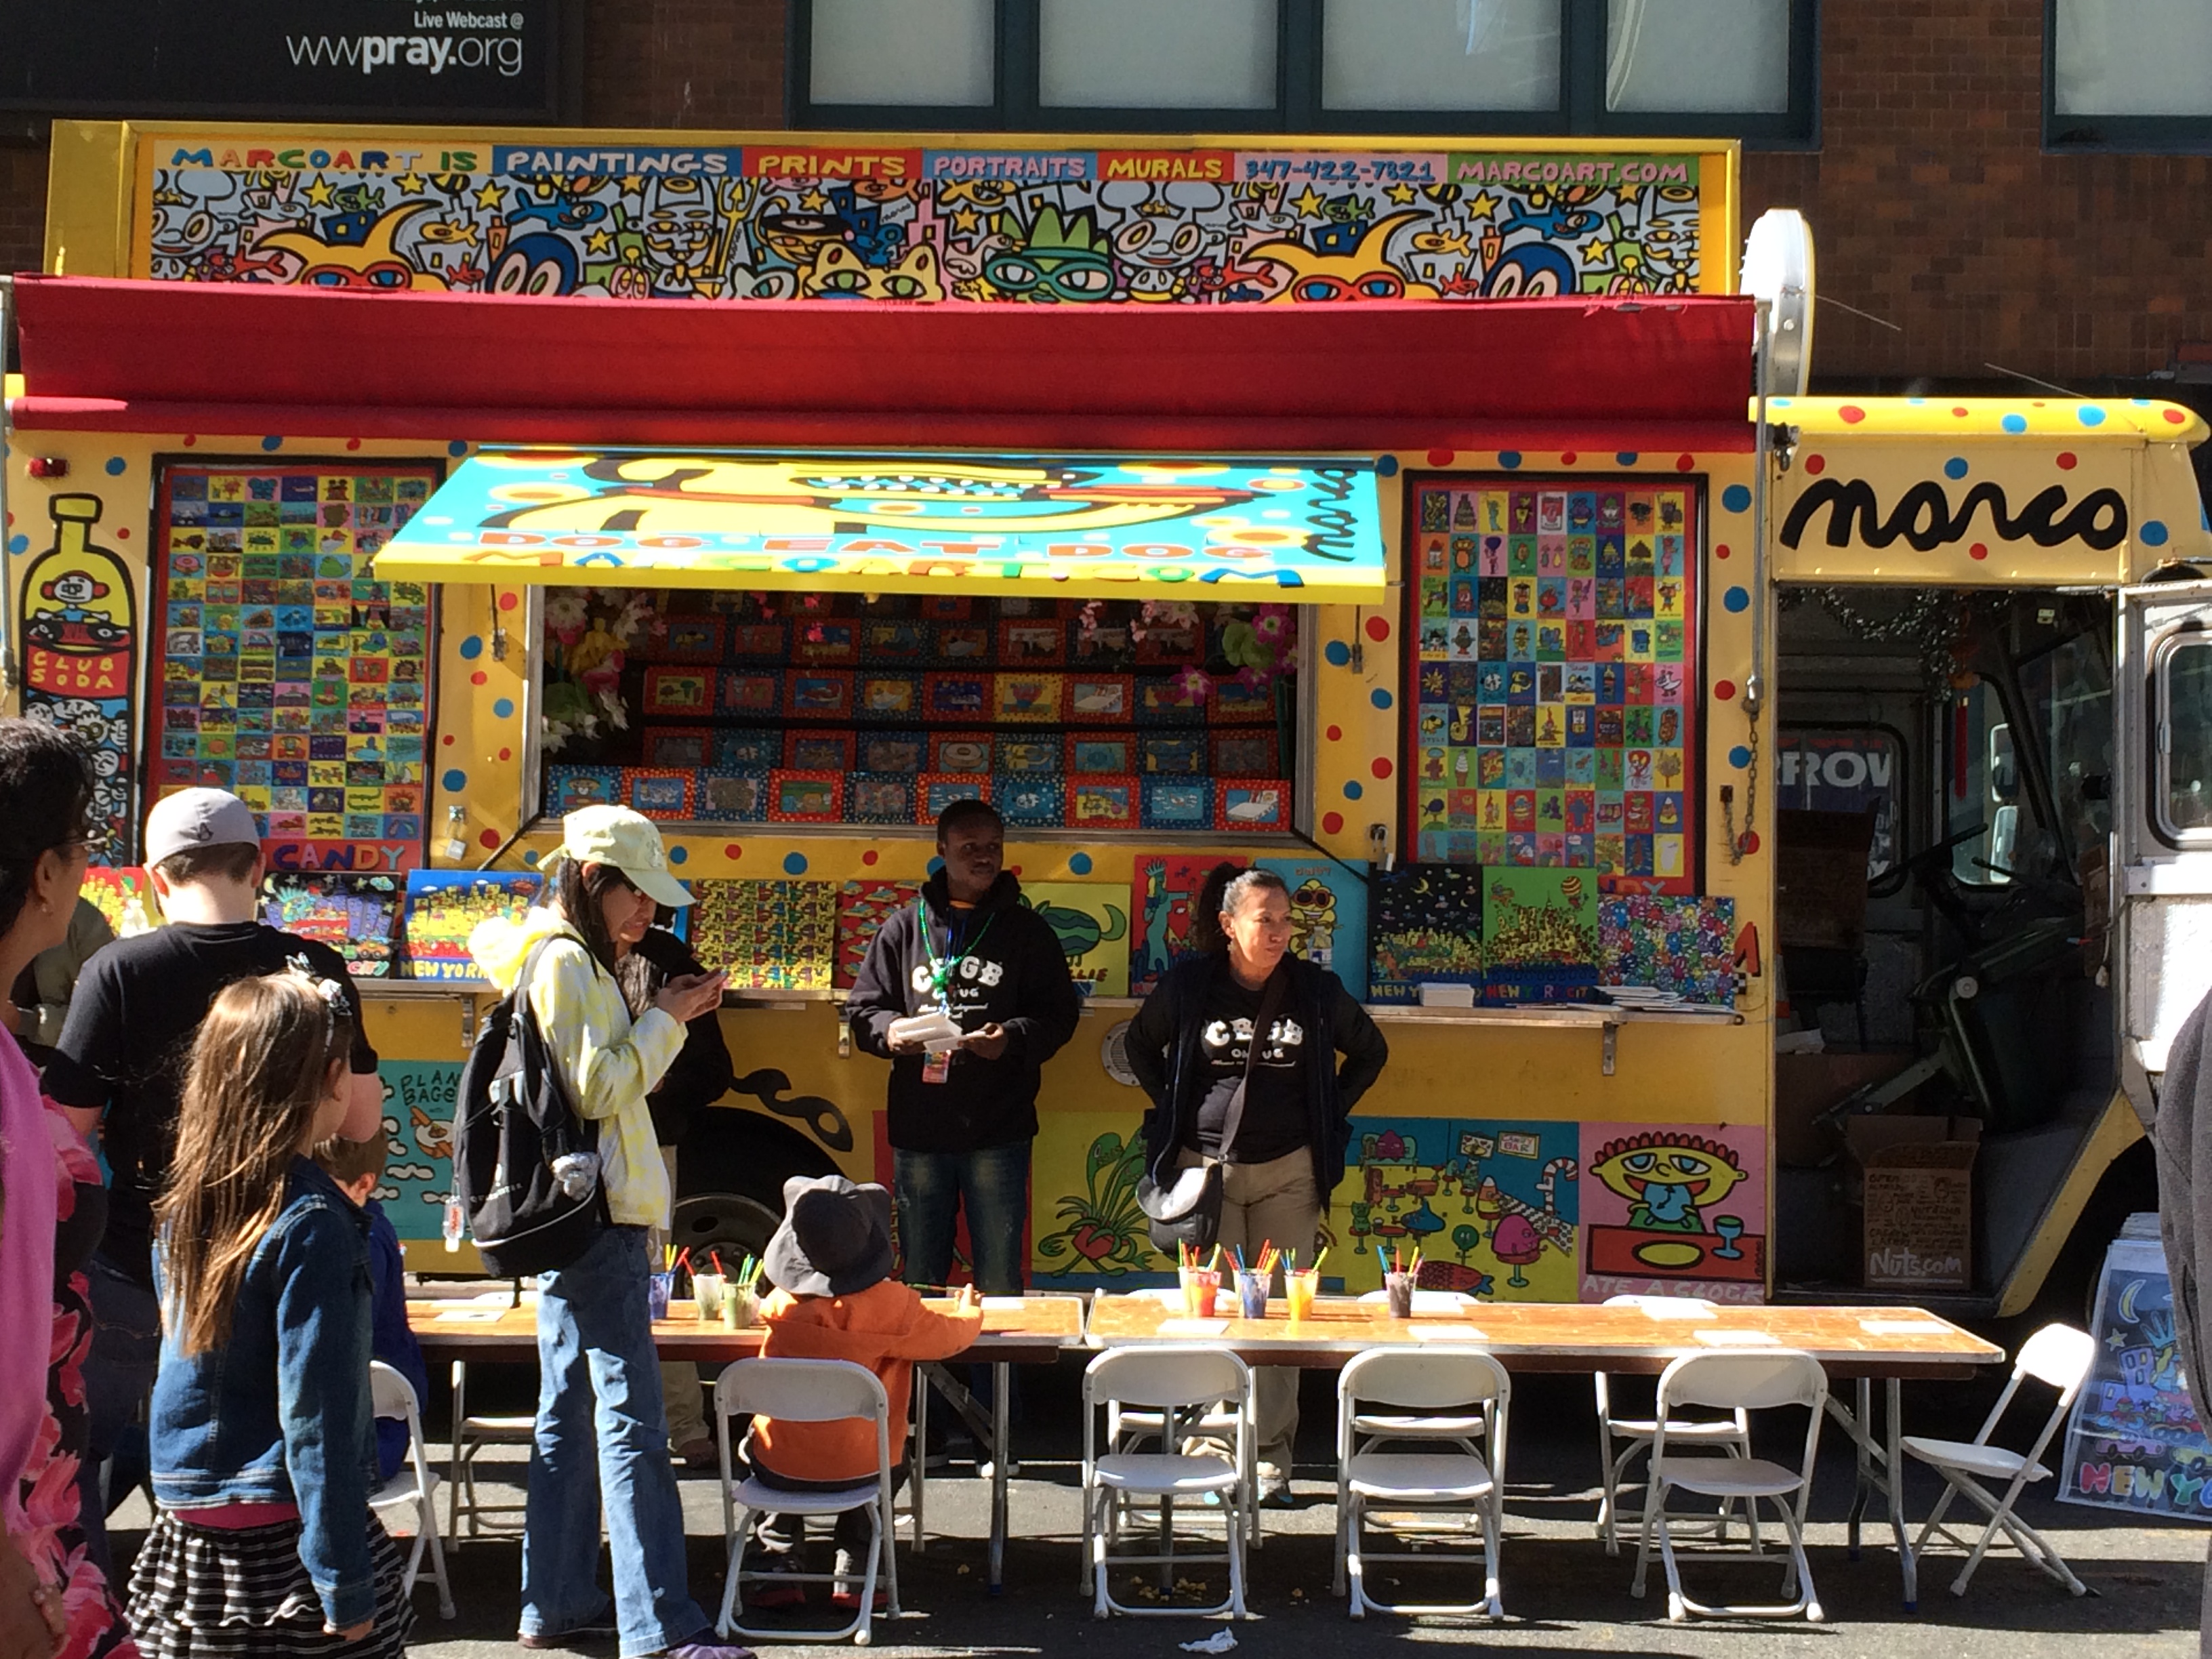
I stumbled upon the CBCG Festival when I was hanging out in NYC a couple weekends ago. The first thing I saw was this incredibly colorful food truck. I thought it was so cool!

When I got closer I couldn’t believe what it was: an Art truck that was sharing art with the public and had tables setup for people to paint right in the heart of the city, all for FREE!

How incredible is that?! When people share art and their time just for the sake of community. How cool would it be if it was normal to stop on the way home from work and paint in the park?

photo


I want my little piece of the web to be just like that: a home for entrepreneurs that are extremely passionate, have a story to tell, want to educate others above all else, and want to learn how do it using video.

I want you to know that video doesn’t have to be complicated, but it does take time, just like anything that’s worth creating. Video can inspire change and action, move others to support the cause you are passionate about and grow your profits and business along the way. But, I also believe that when we put service and story above profits, marketing, and social media followers, we’ll build meaningful communities and lives. Profits and growth will follow.

So if you get anything from my blog and my story, I hope it’s that YOU can influence someone else’s dreams. You can be the reason that the college graduate having trouble finding a job decides to build their own business or why the young high school student living in poverty was able to attend the college of their dreams. The bloggers I read when I first started freelancing changed my life and inspired me to take action. I hope to do that and I know you can do that too.


I know this post is a little more motivational than actionable, but I was inspired by a great group called #fireworkpeople to dig deep and share who I am, what my dream is and what I believe you can do. The community is filled with “creatives, dreamers and entrepreneurs who want to change the world”. Be sure to check out the rest of the tour! You can also follow along on my Instagram.


PS. I finally launched my new free video training course: Amp Up Your Online Video Presence! I’m so excited to get it to you. It’s the best video training I’ve released so far, so don’t wait to check it out. I hope you enjoy it as much as I enjoyed making it.  


Happy Videomaking!  

Download the "How to Reach, Grow, & Teach Your Online Community" guide AND be of service like crazy!

Pick and choose the types of video you'd love to create, get your tools, and start creating!

You got it! Check your inbox!

The Best Tool to Translate Your Story to Video: Video Vision Boards

The Best Tool to Translate Your Story to Video: Video Vision Boards

I first heard about Pocket, in one of those “5 apps you have to download now” articles. It sounded cool. I downloaded it, and it sat there on my phone for weeks. As I started to grow my business, I found myself constantly emailing links to myself for me to remember later. It was a mess. Then, as I was cleaning out my phone there was Pocket. I had totally forgotten what it did, so I opened it and it was like the heavens opened up and rays of sunshine surrounded me. I went save and tag happy (organizing is one of those things that makes me ridiculously excited). This of course led to Evernote and Pinterest obsessions.

As I started to work with clients, I realized how useful these apps could be in communicating their vision with me. I’ve found that the biggest struggle for those wanting to add video to their businesses or make their existing videos even better is communicating their ideas with their videomakers or even understanding them themselves. So I developed a system to solve this problem: A Video Vision Board.

A Video Vision Board is an online collection of links to text, video, photos, etc. that resonate with you. They either spark some kind of emotion in you, relate to your business goals, or you just think they look cool. The purpose is to provide yourself and your videomaker with visuals that explain your vision and help you discover what your videos need to engage in a more meaningful way with your audience.
There are 4 parts to a Video Vision Board:
  1. Text

  2. Video

  3. Photos

  4. Music/sounds


So, let’s make one! There are 3 Easy Steps:


1. Set It Up. If you don’t already have Evernote, Pocket, or Pinterest accounts, set them up. You don’t have to use all of them. Pick and choose the app you like best. Install the browser bookmarks or make the sites easily accessible in your own way. Pocket and Evernote have a chrome extension that allows you with a click of a button to save and tag articles.
2. Start Collecting. Open your app of choice first thing everyday, before you start working. This way you can easily save anything that interests you.

You can either dedicate time to this task or just save things as you stumble upon them. I recommend taking a week to gather everything. Your mood changes from day to day and you can see consistent trends more easily if you embrace that. Let yourself wander! It’s great if you start on a business blog and end up on an etsy shop that sells vintage t-shirts. Collect it all! You’ll learn so much about yourself and your style.

Save everything with at least two tags: “video vision board” and “text/video/photos/music” (whatever the article is). This allows you to filter everything easily. Make any comments that you don’t want to forget later, such as why or what you liked about the article and how it could relate to your videos. (This is easier to do in Evernote and Pinterest. )

3. Research Other Industry Pros. Dedicate time to researching other popular people/businesses that are using video in your industry. There are 2 methods of doing this:

             1. Make a list of all of these influential people and their video links.

             2. Type into YouTube any keywords that would describe your business and make a document with the top ranked videos for each keyword.

             For example, if you are a photographer that wants to create a video series with photography tips of the day, search “photo tips”. Try not to just list the              ones you like. Literally, just pull the top 2 or 3 videos for each keyword. This will help determine why or what about the video made it so popular and                  how to apply it to your video and style.


When you choose everything try to keep your brand in mind; the emotions that you want to evoke, the types of people you want to work with, and the words that describe it. If you find this halting your process, then dont sweat it, just choose things you like and tackle the details later.

And that’s how you create your Video Vision Board!


What do you do after you create your Video Vision Board? Well, you need to understand why you chose everything on your board and how to interpret all of it into your awesome videos. And I can help!
1. I offer a service called Unpacking Your Video Vision Board,

where  I take your Vision Board and provide you with a plan that includes a breakdown all of it’s visual elements and recommendations on how to implement these elements into your videos as well as what ideas will fit your brand and what won’t. I’ll also tell you what you need to do differentiate your videos.

Then I’ll even give you your choice of video production guides, so that you get what you feel you need most to taking action on translating your story and ideas to video.

OR

2. Download the free guide,

I created for small business owners, non-profits and entrepreneurs that details how to get started on your first online video series. It details how to determine your style and create videos that align with your business goals and ideals.

If you sign up below, you’ll also get the fillable template for Step 3: Research Other Industry Pros. If you liked this post don’t forget to comment or share. And let’s connect on social media. I’d love to learn more about you and your business.

Download the "How to Reach, Grow, & Teach Your Online Community" guide AND be of service like crazy!

Pick and choose the types of video you'd love to create, get your tools, and start creating!

You got it! Check your inbox!

If You NEVER Want to Lose Another Family Photo or Video, Follow This Simple System

If You NEVER Want to Lose Another Family Photo or Video, Follow This Simple System

I’m sure at some point in your life you’ve experienced that awful feeling of losing an important or sentimental photo or video. As a video professional I’ve done it too! When I was in film school and editing my first family event, my sister’s sweet 15, I had all of the files and the project file that I was editing in, all on one hard drive and ONLY ONE hard drive. One day, as I was editing, the hard drive fell off my desk, unattached from the computer, and hit the ground. There was no saving it. I wanted to cry. Thankfully, I still had the mini-DV tapes with the raw footage (yes, old school mini-DVs); so I could start over. But I learned a very important lesson: I would never have footage in only one place, and I’d be much more careful about where I stored my hard drives, memory cards, DVDs, and other media. I developed backup systems for my projects, as well as my personal family files. It has become such a habit that now I don’t even think about them. I wanted to share my system of preserving all of my family memories with you so you never have to go through the pain of losing any. Also, some bonuses from using this system are that you will free up space on your phone, always have an empty memory card, and have everything in 3 places: Computer, DVD, and in a Cloud Service.


If you NEVER want to lose another family digital file, follow this system:

1. Transfer your photos or videos to your computer right away. If you put it off chances are you’ll forget and your memory card will get loaded with event after event. You won’t know what you’ve backed up and what you haven’t. If you absolutely can’t get to your computer right away, set a recurring reminder on your phone weekly or monthly depending on how often you take pictures or video. Make sure it is at a time that you are likely to be near your computer.


2. Buy a pack of DVDs and never let yourself run out. There are two options:

The DVD: holds 4gb of data, which is roughly 2000-4000 jpg photos, or 3.5-4 hours of video depending on your camera settings. Remember the higher the quality of your photos or videos, the less will fit on one DVD.  You can buy a 100 pack on Amazon for $24.99. Your local Staples also has similar pricing.

The Blu-ray disc: holds 25gb of data. I personally use Blu-rays only because I have a Blu-ray burner, and I am dealing with a high volume of high quality files, such as RAW photos and MOV video files.  If you want to look into Blu-rays and Blu-ray burners just click on the link. I recommend this burner because it is slim and portable.


3. Burn all of your photos and videos onto a DVD.

If you are on a Mac:

Double click on the blank DVD that you just put into the computer. Then, you can start to drag files over to the DVD’s finder window. Be sure to look at the bottom of the window to see if you have gone over the 4gb of space. If you do, you’ll have to drag some files out of the burn window, until it is below or at 4gb. Try to fill the DVDs up as much as you can so you don’t waste any space. Click Burn when you are ready and enter a title for the DVD (see step 4 below for how to label/title your DVD).

screenshots-mac

If you are on a PC:

When you insert the disc a message will popup asking you what you want to do with the DVD, choose “Burn Files to Disc”. Then title your DVD (see step 4 below for how to label/title your DVD). Choose “like a USB flash Drive” so that you will be able to drag and drop files from the DVD much like a USB drive. Then drag your files over to the DVD folder that has popped up. Click on “burn to disc” when you are ready.

Side Note: A tool like Toast is great for organizing and burning files onto DVDs. It works on PCs and Macs. The main advantage is that you can import all of your files without having to use trial and error to figure out how many of your files you can fit on a DVD. Toast will automatically spit out DVDs when they have run out of space, and then ask you for a blank disc to continue burning. It even shows you how you should label each disc so you don’t lose the order. Toast also does not split your files across DVDs so you don’t have to worry about any corruption. 

screenshots-pc


4. Label DVD accordingly. Use a sharpie to record event or project title, date, and short description. For example:

Christmas 2013

Christmas Eve, Christmas play, Trip to NYC Rockefeller’s center

Write down any details that will be helpful to you in finding what you will need later.


5. Store on a shelf or in a DVD binder. Don’t use jewel cases; they take up more space. Don’t use individual sleeves either. It’ll be harder and more frustrating when you try to look for your files later and have to pull out each individual DVD to read the label. Be careful not to place in extreme temperatures, nor a space that is heavily used. Here is how I store my DVDs:

storage

There are many options of binders that can compliment the design of your space, so don’t think that you have to stick to the standard not-so-pretty binder.


6. I also recommend backing up to a cloud service. Dropbox is great for cloud storage. You can even have your computer back up to Dropbox automatically. There are a couple of different ways to get more free space such as getting friends to sign up, linking your social media accounts or buy some space for $9.99 a month. However, you never know what will happen to these services since they are out of your control, so always have a DVD backup. Once you have two backups (on your DVDs and in the cloud), you can clear your computer without any worries.


Although this system will cost you some money, what you really have to think about is how priceless those baby photos, old photos of your grandparents, or home videos of your daughter’s 1st birthday really are. Not to mention that for less than $40 you can put your mind completely at ease. So start backing up your files.

If you want more tips on family memory keeping, fill out the form below to get on our storyteller list. If you loved this post don’t forget to share and comment. Happy Memory Making! 

Download the "How to Reach, Grow, & Teach Your Online Community" guide AND be of service like crazy!

Pick and choose the types of video you'd love to create, get your tools, and start creating!

You got it! Check your inbox!

Top 5 Ways to Prepare to Film Yourself for Your Online Video Series: Number 1 May Surprise You

Top 5 Ways to Prepare to Film Yourself for Your Online Video Series: Number 1 May Surprise You

5.     Plan

Do you want a personal, conversational vibe or a produced video vibe? This effects your scripts, the location, and how you shoot. Once you decide on your style, outline your video topics and create scripts. When you are first starting, it’s helpful to write word for word scripts so you don’t have to worry about what you are going to say or how you appear on camera. But don’t feel caged in by your script – it’s just there to guide you. Don’t overwhelm yourself by trying to memorize the entire script.


Also remember that you can change your camera angles, or, if you have two cameras available to you, have two setup at 30-degree angles from each other.  Break your scripts into manageable parts and change the camera angle when you pause. Then edit them together later and the dialogue will appear seamless.


Productivity Tip: Plan all of your videos that need to be released on a deadline and shoot them all in one day. For example, if you release one video a week, shoot all four videos for one month in one day. Then you’ll maintain visual consistency and won’t have to setup your video studio multiple times a month. Just be careful to not over-schedule and burn yourself out.


4.     Invest in a stool.

A stool forces you to sit tall and look more professional. Its important to not slouch because the camera exaggerates everything, so even if you think you are only a little slouched, it will appear as if you are not enthusiastic about your message. And DO NOT use a stool that spins or has wheels – it can be distracting to both you and the camera.


3.     Make friends with your camera

Get to know your camera and use it to your advantage. Take at least an hour to learn the functions of your camera before you shoot; find out what settings look best in your shooting location, or where it should be placed to make you look great. Name your camera or put a picture of someone that makes you feel comfortable on the side of the lens and focus on that picture. Change it from an intimidating object to a great friend that is helping you get your message to your community.


2.     Get in the Zone.

To connect with your viewers, it is important to be yourself. Even if you want to have a professional feel to all of your videos, you can still show your personality. So do whatever you need to feel like the best you. This could mean meditating, exercising, or listening to a song that motivates or calms you. I like to sing my favorite song out loud and sometimes even dance. This warms up your voice and your body. When you feel comfortable in your voice and body, it projects through the camera and your viewers can’t help but to relate to you.


1.     Breathe and Stretch

I’m far from a fitness expert, but I did take dance classes until I was 16, and the one thing I value the most about those classes was learning how to stretch. Whenever I am getting ready to shoot, whether I am behind or in front of the camera, I do three simple stretches while taking deep breaths. And yes you can even do these stretches in the dress you plan to wear on camera.

–       Stand straight and tall, lift your arms above your head and grab one hand with the other and push up to lengthen your spine.  You can even lean to each side as you push.

–       Stretch your neck by leaning your head to one shoulder, then the other, forward, and back. Do a couple of these clockwise and counter clockwise.

–       Stretch your legs by bending one leg behind you at a time and hold it with your hand. Hold onto a wall if you need balance.

Again I’m not a fitness coach or doctor so I’m always careful when stretching.


AND remember that you don’t need the best camera or the technical knowledge to start your web series or YouTube business channel. YouTube is a search engine just like Google, so it’s really important to develop your YouTube presence to get found. So don’t wait to get started. If you want more tips on how to film yourself and look great, click on one of the images below to get on our storyteller list. If you loved this post don’t forget to share and comment.

Download the "How to Reach, Grow, & Teach Your Online Community" guide AND be of service like crazy!

Pick and choose the types of video you'd love to create, get your tools, and start creating!

You got it! Check your inbox!

Legal Services of New Jersey Youtube Trailer

Legal Services of New Jersey Youtube Trailer

I created this video to promote the types of videos featured on Legal Services of New Jersey’s youtube channel. It appears in the center of the youtube channel homepage. It was completed with After effects and premiere. The goal of the project was to inform viewers about the mission and purposes of LSNJ’s videos as well as persuade them to subscribe or connect with the organization via social media. I consulted with fellow videomakers to brainstorm the idea for the video but animated and produced it myself.

Their YouTube channel features client stories about legal disputes and how LSNJ has helped, self-help videos in many languages that explain the law and actions you can take, and information on closing the justice gap in New Jersey and nationwide.

Check out their youtube channel at http://www.youtube.com/user/LegalServicesNJ  and  their website www.lsnj.org

Page 9 of 25« First...7891011...20...Last »